
1.Welcome
Thank you for choosing Xews for your online news & magazine website. With theme, you can easily publish any online news & magazine of your choice.
If you need any help please feel to contact us (support@codeworkweb.com)
2.Requirements & WordPress Set Up
- The latest version of the WordPress CMS
- PHP 7.4 or higher. WordPress requires it
- HTTPS support
- All WordPress standard requirements
WordPress CMS
You need a WordPress installation on your website to use our theme.
WordPress Installation
General steps to install WordPress CMS to your site
- Download the latest WordPress version from https://wordpress.org/download/
- Upload the zip file to your website root folder and unzip
- Create a database (using your hosting panel)
- Set up WordPress.
3.Theme Installation Process
First of all, purchase our premium Xews theme. Then you will get an email with download instructions. You can download two zip files. One is the Xews theme and another is our custom premium Newzz Elements plugin for Elementor.
To install Xews Theme with the WordPress Dashboard please follow the below-given steps:
-
- Login to WordPress Admin dashboard.
- Go to Appearance > Themes.
- Click on ‘Add New’ button and then on ‘Upload Theme’ button.
- Click on ‘Choose file’ button and select the previously downloaded theme zip file.
- Click on ‘Install Now’ button and Activate it.
- You have successfully installed the Theme.
4.License Activation
After successful installation, you will have to activate the theme by using the activation code. You will have to enter this code to use the product with ease. You will get an activation code to your email or you can view it by logging in to your account

Once you have activated both themes & plugins you will be able to use it.
5.Demo Import
If you are new and your website is new, the best process to start configuring is by importing our pre-made demo content. Once you import the demo you can replace it with your real contents later.
To import the demo follow the following steps:
- Go to your dashboard and navigate to Appearance > Xews Info
- Click on Import Demo
- If you have not installed and activated the CWW Companion plugin you will be asked to do it.
- After that, you will be able to see demos, select the demo you like to import and click Import Demo
- Install the plugins shown on the popup to import the demo and go to the next step and the import process will start.
After successful import, you can view your website and start editing it.
6.Header Settings
Headers are the first part of your website seen by a visitor. It’s vital because a header is where you add your brand identity, important features, good navigation, and messages about a site’s core intent.
Xews comes with a better way to customize your header with useful premade header elements. We have divided the header with three layers ( Top Header, Main Header and Bottom Header). You can easily customize the elements with features like enable/disable, typography and color of the content, drag and drop elements from one layer to another etc.
The theme has a header builder with this you can easily create any header layout you prefer to, start editing your theme header
- Go to Appearance >> Customize
- Click on Header Builder
After that you will see the header builder, you can drag & drop available header elements to any header part and your header will be ready.
- Click on eye symbol to enable or disable the elements
- Click on the element to view it’s settings
6.1.Menu Configuration
Menu is a powerful tool in WordPress that allows you to add different menus to a location that your theme provides. You can create new menus and then assign location to it.
Xews Theme has powerful features to customize and set labels to your menus. You can set separate icons, color, hover color and background color for each menu item.
To configure menus, follow the following steps:
- Navigate to the WordPress dashboard and go to Appearance > Menus.
- You can either create a new menu or add the pages to the existing menu by selecting them and clicking “Add to Menu”.
- Under Menu Settings at the very bottom of the page tick on “Primary“
- Click on the ‘Save Menu” button to save your changes.
Mobile Menu
A mobile menu is a special type of menu designed specifically for small screens like smartphones and tablets. This is the hamburger icon that readers can click on and use to navigate different sections of your website.
It is important to ensure that your website delivers a consistent user experience on any device. Xews Header Builder provides a dedicated option to design a mobile menu.
To create a mobile menu in Xews, you can follow these steps:
- Log in to your WordPress dashboard and navigate to Appearance > Customize.
- Within the Customizer, click the section labeled Header Builder.
- Click “Eye icon” on to enable/disable it, drag and drop elements to arrange mobile menus.
Mega Menus
Mega Menus are a type of expandable menu where different choices are displayed.
If you own a website with a lot of options and lower-level subpages, then this is the perfect option to display these at a glance.
Xews provides stunning features to design Mega Menu functionality within the theme without any addons/plugins.
Menu Labels:
With the theme, you also can add some labels to your menus, add menu icons, and add separate colors on each menu item for a hover effect. To configure this
- Go to Appearance >> Menus
- Click on your menu items and you will see options


7.Footer Settings
Footers are the last part of your website seen by a visitor. Xews comes with a better way to customize your footer with useful premade footer elements. We have divided the footer with three layers ( Top Footer, Main Footer and Bottom Footer). You can easily customize the elements with features like enable/disable, typography and color of the content, drag and drop elements from one layer to another etc.
The theme has a Footer builder with this you can easily create any footer layout you prefer,to start editing your theme footer
- Go to Appearance >> Customize
- Click on Footer Builder
After that you will see the footer builder, you can drag & drop available footer elements to any footer part and your footer will be ready.
- Click on the eye symbol to enable or disable the elements
- Click on the element to view its settings
8.Home Page Settings
To configure your Home Page follow the following steps:
- Go to your dashboard and click on Pages >> Add New Page
- Add the page title and select Elementor Full Width template from the template

Note: Please make sure that you have installed and activated Elementor for this step first.
After creating your home page not it’s time to change the home page display a static page, for this
- Go to your dashboard and click on Settings >> Reading
- And click on “A static page(select below)” on Your homepage displays
- And on the dropdown select your homepage which you created with the above steps.

Now you are ready to edit your home page.
Note: Please make sure you have installed and activated the Newzz Elements plugin to start further configuring your homepage now.
Now Go to Pages >> All pages
Select your homepage and there you will see “Edit With Elementor” Click on it and you can edit your homepage with the Elementor editor.
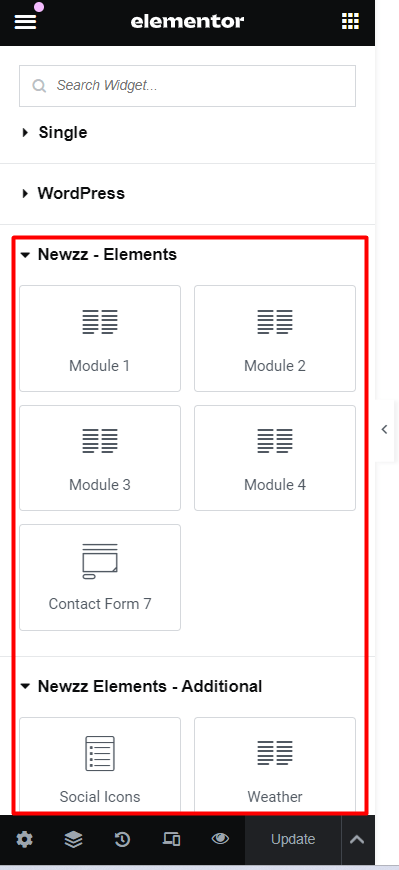
Note: To use our elements scroll down from the Elementor editor then you will see “Newzz Elements” With these elements you can edit your homepage with advanced options and make it any layout you prefer. Drag and drop the elements and play around to fit with your design.
9.General Settings
Go to your Dashboard and click on
- Appearance >> Customize
- Click on General Settings
9.1.General Options
Fallback Image
Fallback image is used whenever your featured image is not available on your posts, you can upload your default fallback image here.
Container Width
You can change your website layout width size to any to meet your requirements.
Sticky Header
Make your header sticky as you scroll down to the page.
Breadcrumb Settings
Show breadcrumbs for your inner pages at the very top
Preloader Settings
Show some loading animation to your visitor while your website is loading. You can choose any animation that is available and also you can upload your own image to show here.
9.2.Maintenance Mode
When you are making some changes on your website or when you want to take your website to maintenance mode you don’t need any plugins you can just enable this setting and display your visitor maintenance mode.
9.3.Custom 404 Page
You can design your own 404 page using any page builder and choose here and set it as 404 page.
10.Inner Page Settings
Go to your Dashboard and click on
- Appearance >> Customize
- Click on Inner Page Settings
Blog / Archive Settings
Here you can set sidebar layouts for your blog pages, make sidebars sticky, and set your blog layouts from available options.
ADS Options
Here you can adjust ADS settings to display on your blog pages. You will have to add your ADS on the widgets area from Appearance >> Widgets and select that area here.
Reorder Items
You can reorder and rearrange blog items from here with a drag-and-drop interface.
Single Page / Post Settings
Here you can set sidebar layouts, make the sidebar sticky, and make your post title sticky as you scroll down the page.
Related Posts
Here you can manage settings for related posts which will be displayed at the last of every blog post.
Category Colors
Here you can change category layouts, and change their colors to meet your design and needs.